Make a bootable Windows 2000 cd with Service
Packs integrated into it.
The creation of this page was inspired by www.bink.nu
Table of Content:
You can integrate the Service Pack in the original installation folder (i386).
The next time you install Windows 2000 on a pc the service pack will have been
pre-installed.
Updating the Windows installation with a Service Pack is called slipstreaming it.
You will need
- a writable CD (CD-R), preferably a re-writable CD (CD-RW)
- images of the boot sector
(originally found here)
- Nero Burning ROM
program, or other suitable CD creation program
- the original Windows 2000 CD
- the ServicePack
you wish to update to - make sure to get the correct language version
- some HD space (400-680Mb) where you will make a collection of the files
needed for the new CD
- for the server CD you should also get updated
Support tools and updated
Deployment tools
- an updated
Terminal Services Client may also be very usefull
- updated files for IE6, Media Viewer, etc. may also find its way onto your
top tuned W2K installation cd
- you may also want to include additional hardware drivers for your specific
hardware
Creating the Win 2000 CD files
| 1. Make two folders on your HD, ie.
on D: |
| D:\ |
 cd-root
 |
|
|
 w2kSP3
 |
|
| 1a. |
copy all files from the Win 2000
CD to the cd-root folder, especially the "i386" folder |
| 1b. |
copy the SP3 file to the w2kSP3 folder |
|
NOTE: Make sure the Service Pack and
Win 2000 CD has corresponding languages
|
2. Unpack the Service Pack file
using the command: w2ksp3.exe -x
|
| 3. Then slipstream SP3 into cd-root
folder, using the Update command in the service pack |
|
D:\win2kSP3\i386\UPDATE\UPDATE.EXE
-S:D:\CD-root |
|
Note: you should NOT point all the
way to D:\cd-root\i386
|
| 4. Check that the correct
identifier files are in the cd-root folder, see comments about boot
files below. |
|
Usually this is automatically
correct, as two of the files come from the original cd, and the slipstream
process copies the third file.
Never the less you need to check that they are all there!
Example: on a Win2000 Pro cd
these three files should now be in the cd-root folder
|
|
- CDROM_NT.5
- CDROM_IP.5
- CDROMSP3.TST
If you put more or less of the identifier files in the
root of the cd, then booting will fail!! Now you have been warned.
Make sure to check this detail. See examples for Win2000 Server cd below
|
| 5. You can now update the support
tools and the deployment tools |
|
The files SP3SupportTools.exe and
SP3DeployTools.exe are self extracting and automatically installing files.
I used WinZip to open the
.exe files and extract the contents to a Temp folder, then copied the
files to the cd-root/Support/Tools folder |
|
|
|
| 6. I also make an EXTRA
folder for updated files like DirextX, IE6, Media Viewer, Free firewall
software etc. |
|
See a suggestion list of Extra
files below.
To make space more Extra Files, you can delete files in these folders:
|
|
\valueadd
\discover
\i386\win9xmig
\i386\win9xupg
\i386\winntupg
\bootdisk
\setuptxt
\support |
3rd party tools etc.
discovering Win2000
upgrade files
"
"
make floppy disks to boot from
informational files
Win2k managing files |
|
Delete the files not the folders
NOTE: do NOT delete any files in the i386 folder.
|
|
|
| 7. It can be wise to also include
the SP3 file itself. |
|
This way the cd can also be used to
update excisting installations.
Create a seperate folder for this file. Do NOT copy the file/unpacked SP
files into the i386 folder. |
|
|
|
| 8. Now you are ready to create the
cd. |
|
See example
of using NERO software
below.
You should have a folder with files and folders that look something
like the picture below. I this picture the cd-root folder has been renamed
to w2kUS.
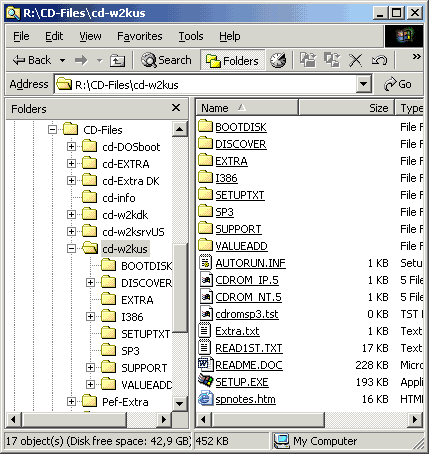
|
|
| A. You may want or need to tweak
some details in single files on your cd. |
|
|
|
| Further enhancements options
Content of the further enhancements options:
- A1. Your original cd does not have the i386 folder
in the root
- A2. You want to remove the need to enter an OEM
number
- A3. Automatically use an answer
file (like the unattend.txt) even on a boot CD
- A4. Subsequent unattended installation of IE 6,
Media Player and any .msi file
|
| |
| A1. |
Your original cd does not have
the i386 folder in the root |
|
If you get the original i386 folder
form a cd that is not in the ROOT of the cd, like some MSDN cd's,
you may need to edit the file: i386/txtsetup.sif
Goto section [SetupData], and change the setup source path, it should read: SetupSourcePath = "\".
|
|
| A2. |
Remove the need to enter an OEM
number |
|
If you want to remove the need to enter an OEM number,
edit the file i386/setupp.ini
[Pid]
ExtraData=646E77637A6F6D79626A1D94089595
Pid=51873000
Change the last 3 digits of the Pid number to 270
Now it looks like this:
[Pid]
ExtraData=646E77637A6F6D79626A1D94089595
Pid=51873270
|
|
If this for some reason does not
work for you, then simply replace the entire contents of the file of an
english installation with
[Pid]
ExtraData=646E77637A6F6D79626A1D94089595
Pid=51873270
And for a Danish installation the entire content is:
[Pid]
ExtraData=646979716B6F646B7973F1ECDF737B
Pid=52656270
|
|
|
|
|
| A3. |
Automatically using an answer
file (like the unattend.txt) even on a boot CD |
|
A standard Windows installation will
ask you a series of questions during the installation, like regional
settings, time zone, network details, which accessory programs to install
and more.
It is possible to predetermine the choises of these setup details, and
have the setup program read the answers automatically from an answer file.
In examples from the deployment information, the answer file is usually
called UnAttend.txt. You need to create such an answer file (unattend.txt)
and then rename the file to WINNT.SIF
The winnt.sif file must then be placed in the i386 folder.
(If you place a winnt.sif file on a floppydisk, and put this disk in the
floppy drive, at the start of the install process, the winnt.sif file on
the floppy disk will take precedence over the winnt.sif file on the cd.)
To create details for the answerfile (winnt.sif / unattend.txt) you can
use the Setup Manager application from the Microsoft® Windows® 2000 Server Resource Kit.
The resource kit also has a complete description of all options for the
answer file .
NOTE: you need more tags in the answer file than the Setup Manager
application creates, in order for the answer file to work as a winnt.sif file located in
the i386 folder.
After this paragraph you will find an answer file that automates everything under the
GUI.
With this answerfile you still need to pick the partition in which to
install Windows,
at the begining of the setup process.
This answerfile supports the danish keyboard layout, and danish
regional settings.
|
|
|
|
|
|
;SetupMgrTag
[Data]
AutoPartition=1
MsDosInitiated="0"
UnattendedInstall="Yes"
[Unattended]
UnattendMode=DefaultHide
OemPreinstall=Yes
OemSkipEula=Yes
TargetPath=\WINNT
NoWaitAfterGUImode=1
[GuiUnattended]
OEMSkipWelcome=1
AdminPassword=adm!
OEMSkipRegional=1
TimeZone=105
AutoLogon=Yes
AutoLogonCount=10
;[GuiRunOnce]
;"d:\runonce.bat"
[UserData]
FullName="Preferred Customer"
OrgName="Acme Computers A/S"
ComputerName=NewPC
ProductID="xxxxx-xxxxx-xxxxx-xxxxx-xxxxx"
;[URL]
;Home_page=about:blank
[Display]
Xresolution=1024
YResolution=768
Vrefresh=70
[TapiLocation]
CountryCode=45
Dialing=Tone
[RegionalSettings]
LanguageGroup=1
SystemLocale=00000409
UserLocale=00000406
InputLocale=0406:00000406
[Identification]
JoinWorkgroup=ACME
[Networking]
InstallDefaultComponents=Yes
|
|
|
|
|
Here is another example
of unattended bootCD and winnt.sif, with english regional
settings.
It also has automatic partitioning and details about the network setup. |
|
| A4. |
Silent install (automatic and
unattended install) of ie. IE6, Media Player
or any *.MSI based file |
|
A silent, or unattended, installation is one that presents no user interface.
To run an installation silently, use a command like this in a batch file
MsiExec /I D:\Example.msi /qn
Note: The /q option specifies the "level" of user interface to display, and the n specifies that no interface should be displayed.
Msiexec.exe is located in the system32 folder on Windows 2000 and XP.
(local version of CommandLine options)
|
|
|
|
|
You can find more information here:
Microsoft
- About Windows Installer
Microsoft
- Installer - Command Line Options
InstallShield - Windows Installer Edition
HOWTO: Creating a Silent Installation |
|
|
|
|
| B. Trouble shooting |
|
|
Boot Files.
w2kboot.bin
CDROM_NT.5
CDROM_IP.5
CDROM_IS.5
CDROM_IA.5
CDROM_ID.5
CDROM_SP.TST
CDROMSP2.TST
CDROMSP3.TST |
CD bootsector
NT5 CD Identifier file
Professional CD Identifier file
Server CD Identifier file
Advanced Server CD Identifier File
Datacenter CD Identifier File
Service Pack1 CD Identifier File
Service Pack2 CD Identifier File
Service Pack3 CD Identifier File |
The slipstream process will usually leave the necessary files in the cd-root
folder.
On a Win2000 Pro cd these three files should now be in the cd-root
folder
- CDROM_NT.5
- CDROM_IP.5
- CDROMSP3.TST
On a Win2000 Server cd these three files should now be in the cd-root
folder
- CDROM_NT.5
- CDROM_IS.5
- CDROMSP3.TST
On a Win2000 Advanced Server cd these three files should now be in the
cd-root folder
- CDROM_NT.5
- CDROM_ID.5
- CDROMSP3.TST
NOTE: if these three files are NOT in your cd-root folder, your installation
will fail.
Extra Files
Now it's the time to add extra files like drivers and setupfiles of IE6, Media
Player 7.1. This way you fill up your CD with the software you want!
I put in in a folder named Extra, but you can name it anything you want.
The extra software won't install by it self you need to use unattended scripts (winnt.sif) to auto install this software.
Creating the CD using NERO
software
- Start NERO in full version (not express) and
- click New then
- select CD-rom (Boot)
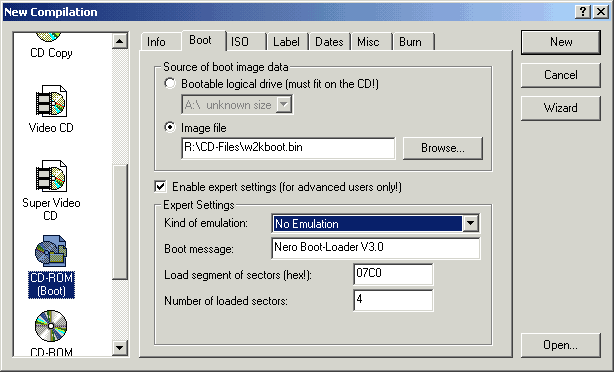
In this window you do the following:
- point to the w2kboot.bin file
- choose No Emulation and
- type 4, in Number of loaded sectors
Now select the ISO tab
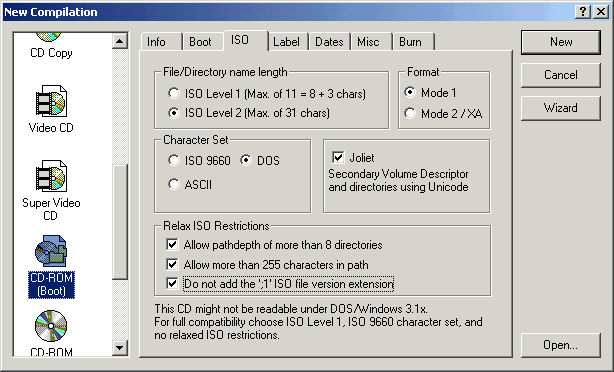
Just make sure you have choosen everything as in the picture
- Name length: ISO level 2
- Format: Mode 1
- Character set: DOS (otherwise ~ will be converted to _
and installation will fail)
- Joliet
- Relax All ISO restrictions, especially "Do not add ';1' ISO file version
extension
Now drag all the files from the cd-root folder to the ISO1 window.
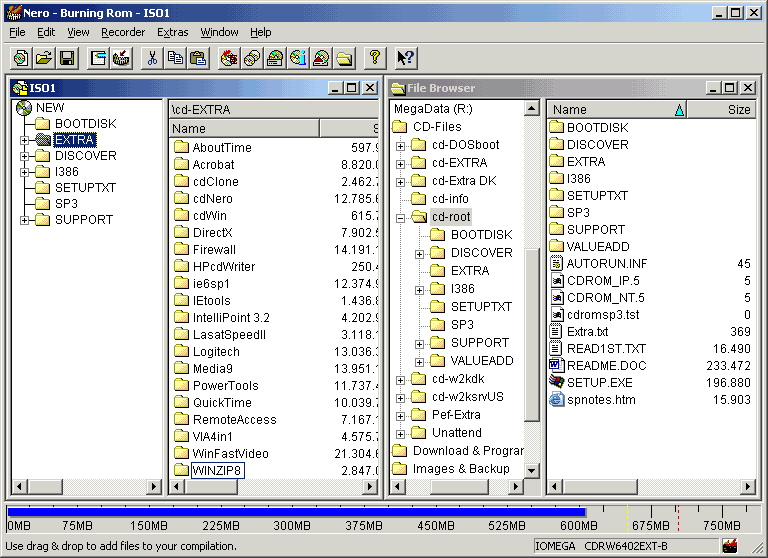
And you are ready to burn.
Select File and Write CD
Make sure to choose Disc-At-Once
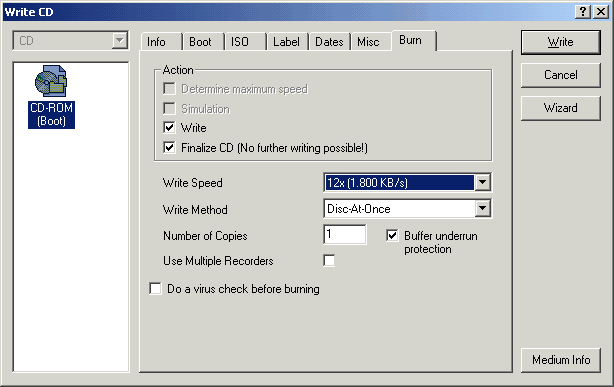
Now press Write
| ADVICE: Start your test on CD-RW if possible.
The reasons being: |
- even though these instructions have been tested and work well on my
system, something might work different on your system, or a setting
may trouble you.
- you may soon find that you will want to update some of the extra
files or add hotfix files
|
|
Using CD-RW disks you will not find yourself going through
new cd's every week.
Once you are comfortable with what is on the cd, you may want to make a
CD-R disk, version 1 |
Credits
I have used www.bink.nu as the main template
for creating the pages about the bootable W2K cd.
The keys to the winnt.sif file comes from the unattend
bootable CD description from School of Health Science example
The following credits are from the www.bink.nu
website, as these may also be of interest to you, I have choosen to include all
the credits.
Tip from www.nu2.nu When trying to create a bootable copy of an OS from the MSDN cd's, you'll get an error during install: End User License Agreement (EULA) Not Found. The solution for this is to edit the file i386/txtsetup.sif section [SetupData], and change the setup source path, it should read: SetupSourcePath = "\". (because on the MSDN CD the setup root is not the root directory of the CD).
These instructions are based on instructions made by Doug Kahler
on his website during the NT5 beta period in 1999.
John Savill also posted instructions about this subject on
NTFAQ may 2000.
Main credits must go to Joseph R.
Worrall, he was the first posting instructions in newsgroups which were used to create mentioned
websites.
Another great BOOT CD instructions Website by Bart Lagerweij
Get all win2k versions on 1 CD !!!!! See instructions on this site Twinkie's How-to Website
Product-key tip by www.thetechguide.com
ToDo!!!
Under Extra Files
- example of batch file that auto installs software, after the windows OS
installation
- list of extra files
Make example of burning a cd using the demo version of WinCD


